Saturday, September 7, 2013

New York City Part Two: Extras

Woot! So this is just random stuff from NYC.


I won a fight with my friend's sister over this bag hahaha. 


We passed this cafe on broadway at night. It was like 10:00 but people were just beginning to eat dinner!


I got these adorable fish earrings in Flushing.


Gourmet Ramen!


And finally Tiramasu coffee.. omg it was amazing...

♥ Nat

Saturday, August 31, 2013

New York City, Part One: MOCA and the Maid Cafe

So I'm gonna do this in a couple parts cuz I took lots of pictures.


So awkward story here...we didn't actually go to the maid cafe...But we saw it on the way out. Oh and you can see the maid outfit in the window! Its basically a cafe with waitresses wearing maid costumes. They're super cute!


We took a trip to the MOCA to look at history-ish stuff. It was okay but I liked the Asian fashion designer part a lot more. 


The bathroom was super posh man.


Part Two will be up next week :D

Nat


Tuesday, August 20, 2013

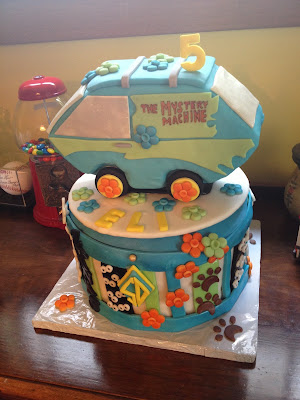
Scooby Dooby Doo Cake!

Scooby Doo Cake

So here is the Scooby Doo themed cake I made for my cousin's fifth birthday party. I didn't want to put Scooby or any other members of the gang on the cake because all of the attempts I have seen of replicating the look of the characters were complete fails. So I went with the Mystery Machine and some other little things like the "zoinks", the dog bones, the paw prints, etc. 


   XOXO

     ~Esa

Sunday, August 18, 2013

I'm going to NYC. Again.

So last time I went to NYC I totally didn't do a post on it but now I'm going again and this time I'm gonna do a haul post when I get back :) so excited :D and yes this is just an update but my next post will be awesome. Oh and school is starting soon... Depressing.

Nat

Tuesday, August 13, 2013

J & J Wedding Cupcakes

Wedding Cupcakes!


I had a family wedding this weekend and many people brought home made baked goods (including me!). This was sort of a second wedding for the couple. They got married in Kansas about 11 weeks ago, and renewed their vows and celebrated again in Pennsylvania this weekend! Sooooo they did not have a traditional wedding cake this time. Instead, family and friends contributed a vast variety of baked goods such as cookies, candies, scones, and cupcakes! And it worked out very well! 

I chose to make three kinds of cupcakes...


Peanut Butter Cupcakes with Dark Chocolate Buttercream

I chose to do a chocolate/peanut butter combination because it is a favorite of the couple...and a favorite of mine as well :) But it turned out that a lot of people had the same thought process as I did (Hey! They both love peanut butter and chocolate! I should do something with those flavors!). So there were probably more Peanut Butter/Chocolate flavored things than not! I hope there weren't people there that happened to be allergic to or not like peanut butter and/or chocolate.... That would significantly limit their selection!  
For these, I put flat, shaped, textured, ivory gumpaste decorations (they don't have a name and I don't know what to call them) on top of the dark chocolate cupcake swirls. 


Vanilla Cupcakes with Blackberry Italian Buttercream 

The groom likes basic vanilla cake, so I went with that and paired it with a fruity or "berry-y" buttercream. I did some experimenting to find a really good recipe for the vanilla cupcakes because something basic like that shouldn't taste too "basic"...that wouldn't be good! Then I gave my Real Italian Buttercream an exquisite blackberry flavor by using gourmet blackberry purée. This one was very popular :)
For decorations, I place an ivory gum paste rose (with a leaf) atop the swirled tower of blackberry frosting and used both 3mm and 6mm ivory dragees (the pearl-like, spherical sprinkles). I had to hand place each individual dragee because they wouldn't stay on if you just sprinkled...but I think it was worth this incredibly tedious step.  


And last but certainly not least...

Vegan Red Velvet Cupcakes with Vanilla Frosting

I wanted to do a completely vegan (both the cake and the frosting!!!) option for a couple reasons...(1) to be considerate to people that are vegan, lactose intolerant, etc. and (2) to provide something that meets these restrictions but is also delicious from everyone's point of view (or point of taste?). A lot of people expect vegan baking not to taste as good as "non-vegan" baking but that is not always the case. It depends on the recipe! This one does NOT follow that stereotype according to everyone I talked to that tasted these. 
These cupcakes' decorations were more personalized to the bride and groom and the occasion. Some envelope-looking ones with their names and hometowns where the different celebrations were held, and then some that were based on the insert from the invitations which featured the dated of both events. These decorations brought many smiles :)


Please excuse the frosting spots that got on the decorations and papers. That was the fault of the kitchen staff at the wedding. They did stuff with the cupcakes that resulted in those imperfections (which later caused me to have a panic attack in the bathroom...I am such a perfectionist and a little OCD...and I was rather stressed - that didn't help either).

Anyways, that was my most recent baking project. 72 cupcakes was the plan but each recipe made between three and six extras. I believe there were 87 all together. 
Next: Scooby Doo Cake for a 5th birthday party!

<3

~Esa


Monday, August 12, 2013

Update: I Cut My Hair!!

Huzzah! After like 2 months I finally was able to cut my hair :D
I just have a couple pictures...


Correction: One picture.
I really wasn't feeling photogenic today, you know?
Omg and I'm like really excited for the new Doctor as well...he's that dude from World War Z and was in the Fires of Pompeii I think--I DON'T KNOW
Anyway. I haven't been doing anything too interesting except listening to this all day hahahha. But like whatever okay! I'm enjoying my summer.
 I'm trying to learn to draw with my tablet but like seriously...I could use a touch screen computer.
Bobby pins have become my worst enemy...they never listen to me or stay in my hair. DARN YOU BOBBY PINS
BY THE WAY you should like us on Facebook here
 *wink wink*
*cough cough*

Nat

Saturday, July 27, 2013

Smiling Eyes Look

Well I was GOING to do my NYC post, but then I was like...naaahhhh. I didn't buy anything or do anything particularly interesting because I've been there so many times.
Apparently it is really popular in Korea to have these sort of bags under your eyes. Not like suitcases, but a little fat under the eyes that one has when they are young. The bags make a person look younger and more youthful. Is that the same thing? Whatever.
People even get it surgically injected to achieve the look. So I'm gonna show you how to achieve these cute puffy eyes without needles. *Shudder*


Okayyyy So all we need are brown and white. If you don't have these colours I'm sorry, but hello CVS..?


Lets start off with lining your lower lashline with white. You want to create the illusion of puffy eyes first.


With a darker brown (not black, you're not a panda.) underneath the white, draw a line to create the fake bag. Don't worry if it looks odd, you can blend it with a lighter colour later.


Even when you're not smiling it will look like you are. Perfect for depressed people(?)
some of my pics are blurry because I don't really look at my camera after I take a picture of my eye...oops.


With the same brown, brush it on your eyelid for some depth. Or just use some random colour, but if you want a more everyday look just use brown.


Don't line your eyes too thick or dark because you want that sort of innocent look. I just used black eyeshadow and a tiny bit of mascara. Fill in them brows too.
AND BAM YOU'RE DONE. Easy, no?
Looking up close at my eye reminds me that I really need to clean them up....
So I think this look looks (hahah look look) a lot better in natural light, so I didn't use my ring light this time.


Luckily my uncombed hair just looked wavy. Perfect.


OH NOOOOO BLURRY PIC!!! It looked so good on camera...What happened?


I stopped taking pictures at high angles like all the photo-taking-people (What're they called?....PHOTOGRAPHERS. That's it.) said because it just makes me look very...derpy. I really love this look and I think I'm gonna wear it more often.
Oh yeah and I'm gonna cut my hair a little above shoulder length. And I would dye it brown if I could. *Cough*
I vill shee yoo necksht veek.

Nat

Wednesday, July 24, 2013

Update

Sup. So we went to NYC a day ago, and I'll be putting up a post on Saturday for y'all :)
I'll probably do a makeup tutorial as well. And like omg I ate waaay too much food in NYC...
Anyway. Very depressing update but I have no idea. I'm typing this on my nexus and it keeps correcting my words. Thank you autocorrect.
I should draw comics and post them here...if only I could use my tablet well...
Shemurr. I want a touch screen computerrrrrrrr
Dear Santa....
I would draw the comics on paper but then I would have to scan them in....
All that work...
ANYWAY.
I'll seeya guys soon.
Wait for me!

Nat
( I can't make a heart shape on my nexus...)

Sunday, July 14, 2013

Splatter Painted Shoes!!

Splatter Painted Shoes!

D.I.Y.

If you have a pair of white (or perhaps another solid color?) shoes that aren't looking so great anymore, it's a fun and easy project!

I used white canvas shoes (which seemed to work quite well!). I had actually gotten some paint on them when I was helping some 6-8 year olds do Jackson Pollack inspired paintings. And I decided to embrace the splatters that ended up on my shoes!

So here's the before shot...


Notice that I removed the laces and stuffed them with tissue paper in preparation!

Splatter paint time! Now, I used acrylic paint (which I watered down). To apply I used sticks (disposable chopsticks and paintbrushes that the bristles fell off of), dipped them in the diluted paint, and flicked, flailed, and waved them about in the general direction of the shoes. Also, I took it one color at a time, then went back with each color!

Done splatter painting!!!


When they are dry clean up the soles and put the laces back in (if applicable) and voila!


They're done :)

...And ready to wear!!!


I wore my splatter painted shoes for the first time today (I did this project on Saturday) and I've already gotten multiple compliments on them!

Enjoy the week!

XOXO

~Esa 

Thursday, July 4, 2013

HAPPY 4TH OF JULY: A makeup tutorial

HELLOOOOOO WHO'S CELEBRATING THE FOURTH OF JULY ALONEE???
Hahhaha.
Red white and blue eyes anyone?

Let's start with white eyeliner on the inner third of your eye. Use a white eyeshadow to blend out the liner. Don't forget to put some on your waterline for bigger eyes. If this is too harsh, use a skin coloured eyeliner instead. 


Apply a bright red on the center of your eye.


On the outer corner of your eye, add a dark blue.
And that's pretty much it! easy right? Using eyeliner might overpower this already bold look, so if you want to darken your eyes, use black eyeshadow for a softer look. I'm lazy so I just put on mascara.


Okay so obviously this isnt a wearable look but I mean you can still rock this for parties!

♦♦♦

I also decided to show what my "studio" looks like. It's my room. AND YES I HAVE POOH BEAR STICKERS SO WHAT??


So that's all I got. HAVE A HAPPY JULY 4TH! And if you're not American, you can still use this tutorial, just maybe with different colours?
♥Nat